Here we are starting to work on the plan. Planning is fun. Planning is dreaming. But then comes the doing part. The “doing” will, of course, create the beautiful and bountiful yard I want, but the doing requires time and money. Keeping that in mind, I will be considering both of those resources when I am planning. I admit in my case both of those can be quite scarce at times, but I’ll figure out a way. I will be creating a Master Plan page for this blog that will give descriptions of all the weekend projects. I will also list which ones will require more time and money than others. We will need to space out projects that will cost more to complete, as our budget only allows for a certain about each month. For this posting, we will jump right in to the first project after a little background information.
We live on a small town lot that is about 75’ x 100’. After living in the country for 14 years with acres and acres around me, I had to make some adjustments when I first moved here about 2-1/2 years ago. For example, I no longer walk out in my pajamas at 4:00 in the morning to let the dogs out because my neighbor is often sitting out on his back porch having a cigarette (well I could, but I don’t). I also love to sit quietly by our stagnant 1920’s pond (which, believe it or not, has three goldfish, oodles of frogs, bathing birds and a snake or two that goes slithering by), but it’s not very relaxing when neighbors are bouncing on their trampoline yelling, mowing their lawn, or worse yet, using their leaf blower. They certainly have the right to do all of those things, but somehow, sitting on the bench with my eyes closed, taking in the sounds around me, or watching the calmness of the pond, just isn’t quite as peaceful, so I have learned to accept certain aspects of town life and some of our projects will be to create more privacy without causing us to feel claustrophobic on our wee little lot.

So, here I am at my small town home with its quaint little yard just waiting to emerge. Onward…
Measurements (it’s always good to know what you’re working with):
Lot size: 75’ X 100’ (approximately) = 7500 square feet
Space taken by structures: 3400 square feet
Ground with no structures: 4100 square feet
Dense shade: 1000 square feet
Dappled shade (off and on throughout the day): 2300 square feet
SUN (8 hours or so): 800 square feet
Please excuse the roughness of my drawing for this posting. On the “Master Plan” page, I might even experiment with one of those landscape design software programs. We have one that we picked up at a book sale somewhere. That might be kind of fun. At any rate, here is what our property currently looks like with the plants we now have. It is pretty much to scale.
T = tree S = shrub (mainly rhododendron, azalea, camellia, or lilac) R = rose
We’re starting out kind of small for our first weekend project. It will focus on the northwest side of the house.
Materials needed: Compost (to work into the soil a little) and a top layer of mulch.
Cost: $20.00 (We are planning to buy a load of soil and mulch at my next pay period, a much more cost efficient way to go, but for this first weekend, we are going to buy a couple bags of mulch that are on sale right now. There is a Master Gardener plant sale this weekend, so I want to save money for that. I love plant sales, as I imagine most gardeners do.)
Work needed: Mostly just weeding and cleaning up, moving a peony that was planted in dense shade before I got here, spreading mulch and perhaps planting something I find at the plant sale.
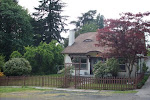
This is what the area looks like now:
Check in early next week for what it looks like after we’ve completed our
FIRST WEEKEND PROJECT!